Pulse Surveys
Hello Admin! Pulse surveys are a powerful tool in our Performance and Talent Module for gathering feedback about specific questions. Here's a step-by-step guide on creating, managing, and analyzing pulse surveys on DecisionHR.
Why Pulse Surveys Matter
Pulse surveys are one-time surveys with a specific deadline for gathering feedback about particular subjects. You can use these surveys for purely work-related questions as well as for social questions.
Accessing Pulse Surveys
After logging in to DecisionHR with your admin credentials, you can access pulse surveys from the standalone menu item, Pulse Survey, on the sidebar of your dashboard.
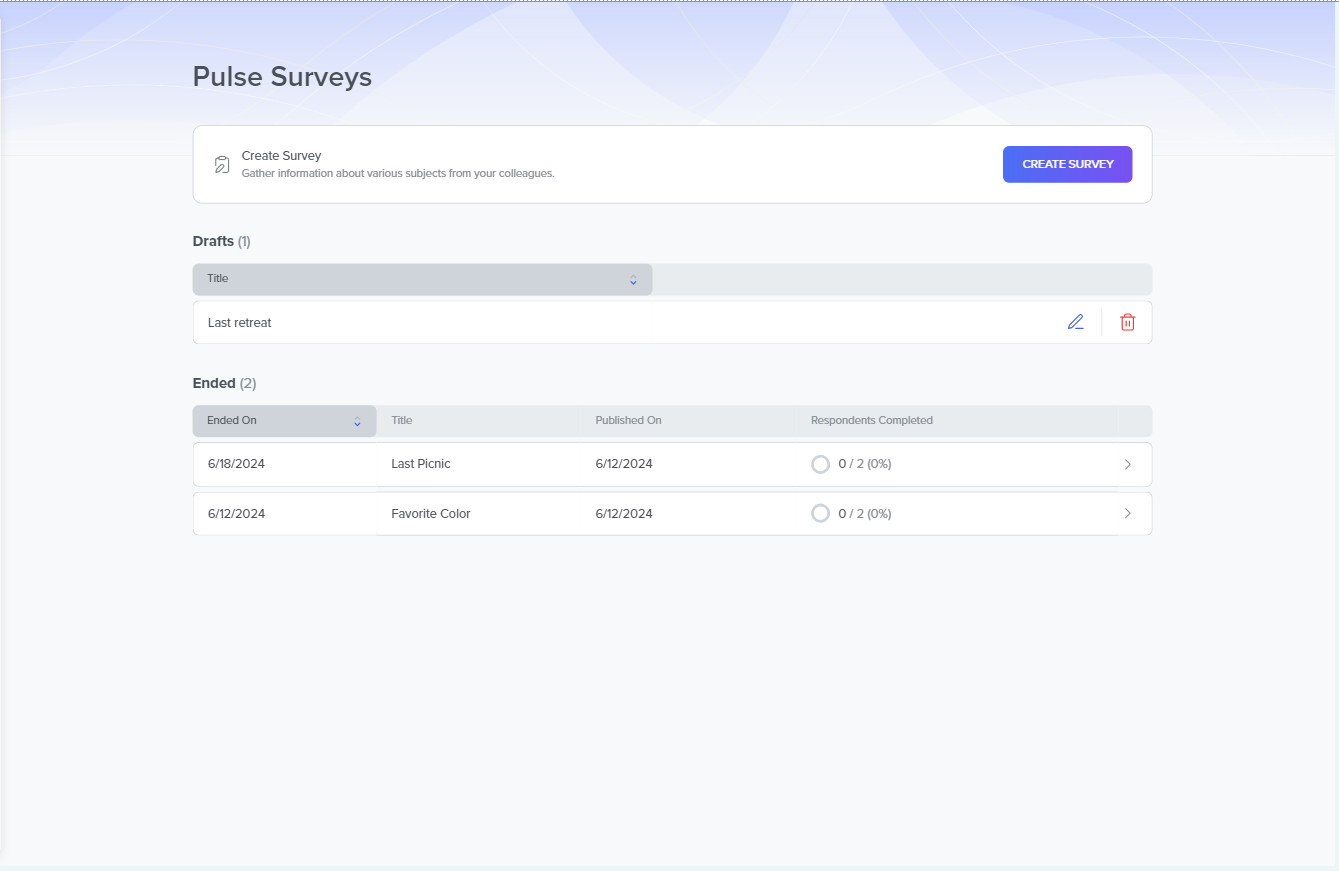
Managing Pulse Surveys
Pulse Survey has four sections where you can complete different tasks. The sections are:
- Create Survey
- Active and Scheduled Surveys
- Drafts
- Ended Surveys
Create a New Survey
You can create a new survey by clicking the Create Survey button at the top of the Pulse Survey page. This click opens a modal that contains a 2-step process.
The first step has the following fields:
- Title: This field requires you to type in your survey's title.
- Info Message: An optional field where you type in the message about the survey for your respondents.
- Questions- This is a required field where you add the questions in your survey.
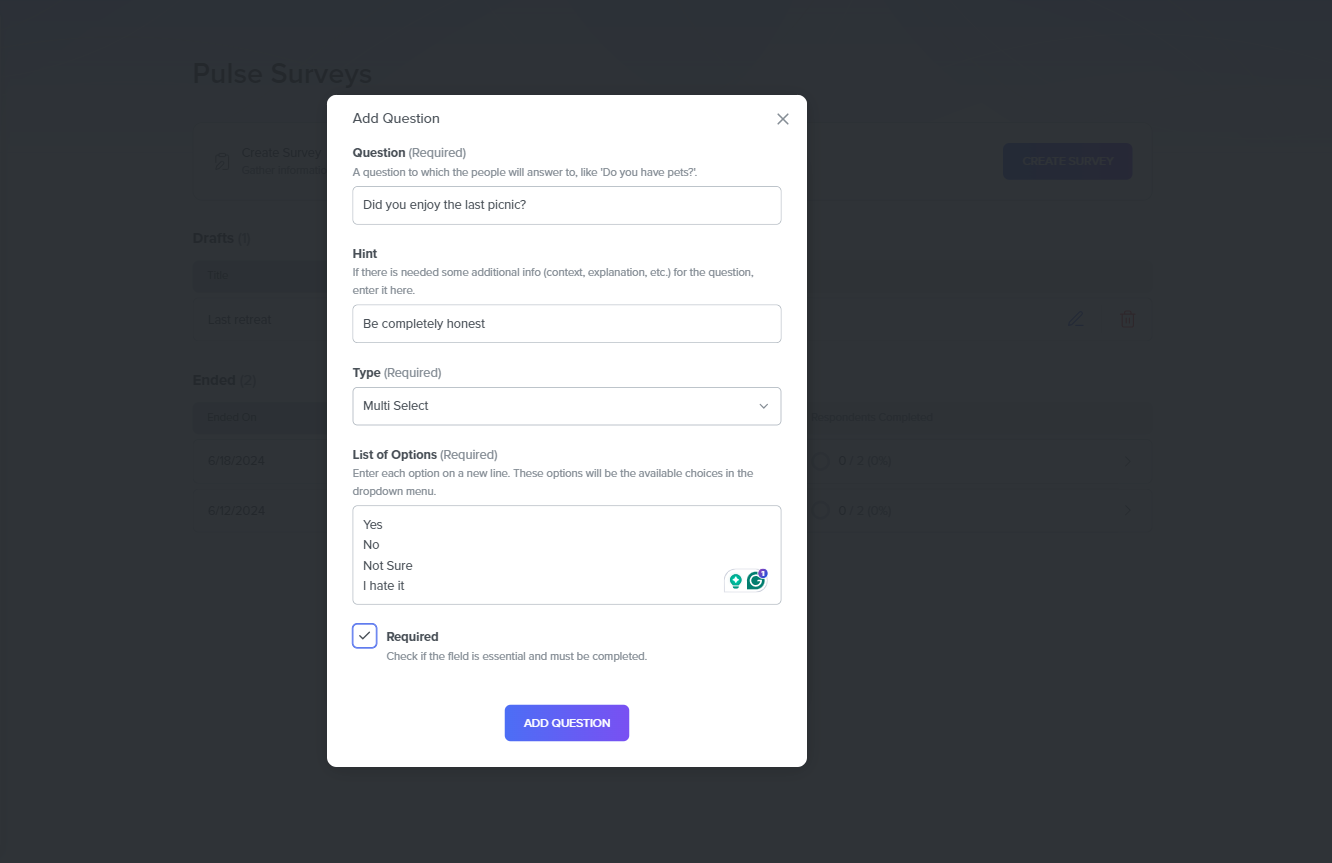
Questions
To add questions, click on the Add Question button. A question dialog modal opens with different fields to complete. The fields include:
- Question: A required field that contains questions your respondents will answer.
- Hint: An optional field where you can add additional information, context, or explanation depending on the nature of your question.
- Type: A required field where you select the response type to your questions.
Type
Currently, you have eight answer-type options to select from. Depending on your choice, there may be an additional field. Below is the list of options and what they mean:
- Text type: A short text.
- Multi-line Text type: A long text.
- Single-select type: Respondent can only select one option from the list.
- Multi-select type: When answering, the respondent can select more than one option from the list of options.
- Date: Respondents can only set dates to respond to the question.
- Checkbox: Respondents can toggle on or off the checkbox to answer—a form of Yes/No response.
- Currency: You can select a currency from the list of options.
- Number: You can type in any digit.
- Required: A checkbox you toggle on if the question is compulsory in the survey. Complete by clicking Add Question.
After adding the number of questions your survey should have, you can proceed to the second step by clicking NEXT.
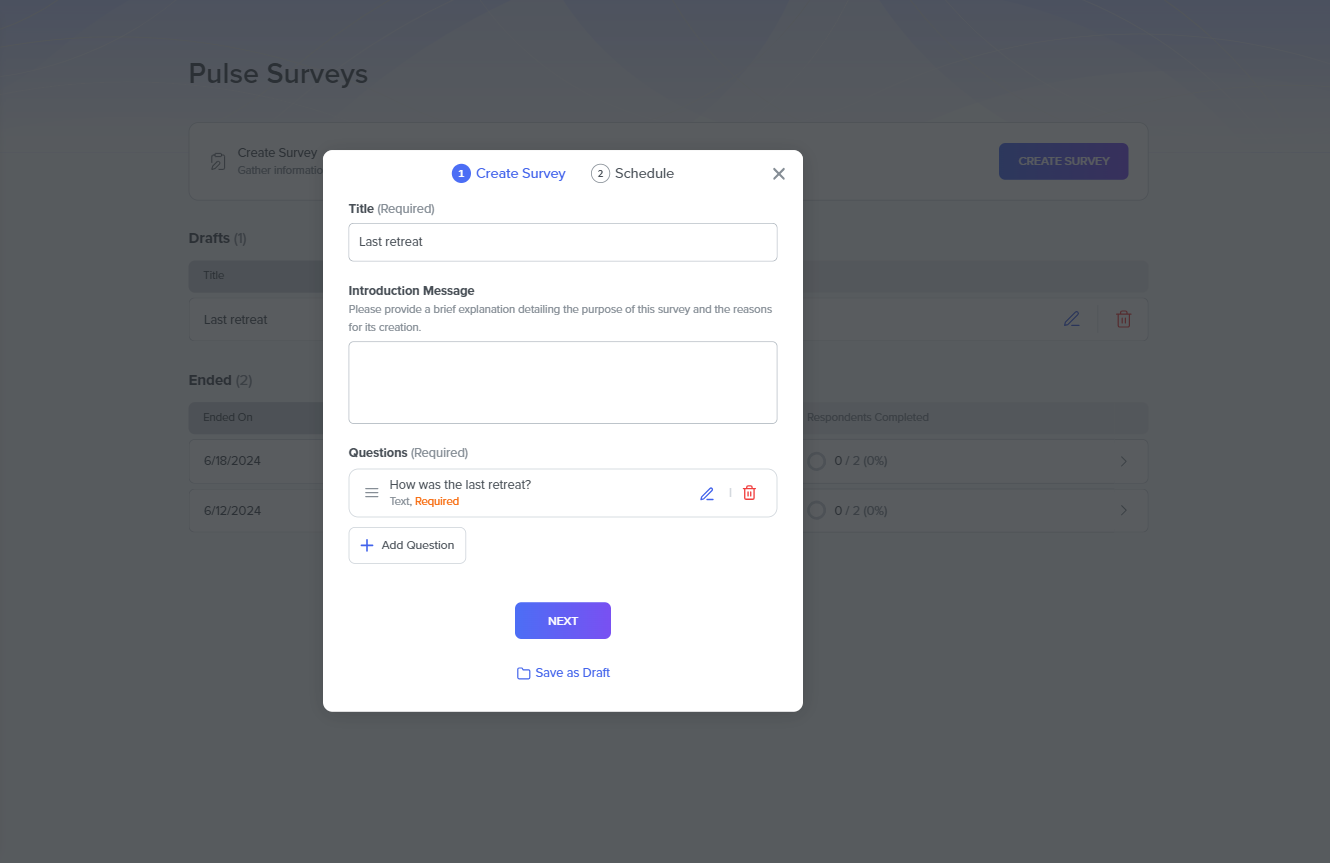
Also, you can save the current form as a draft by clicking Save as Draft to be accessed in the Drafts section.
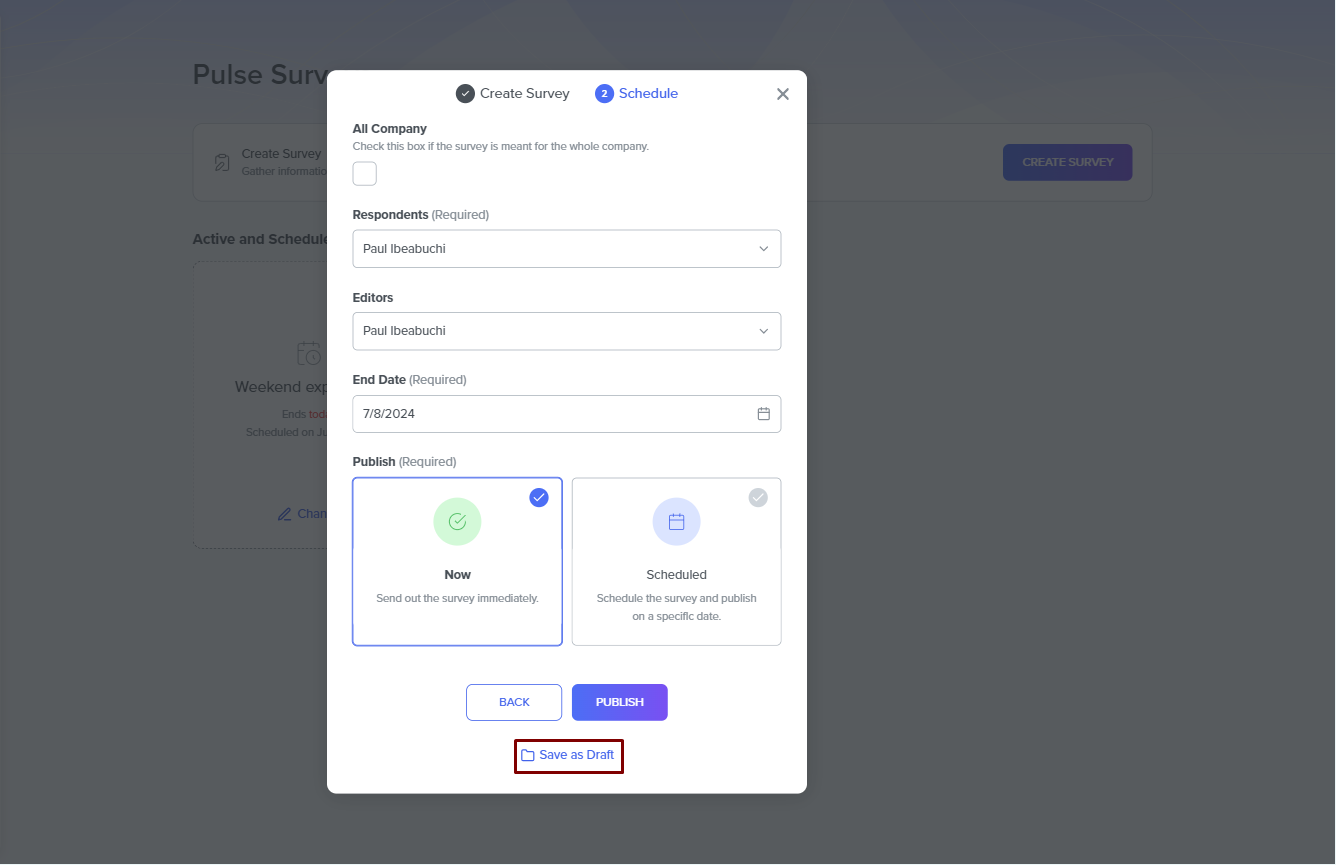
The second step has the following fields:
- Respondents: A required field to select the respondents to your survey, which can be all, none, or some employees you select by their names. There is an outlying checkbox directly above this field you can toggle if you want the whole company (including executives) to respond to your survey.
- Editors: Choose employee(s) who can be editors of your survey from the list of current employees.
- End Date: A field required to set the deadline for the survey.
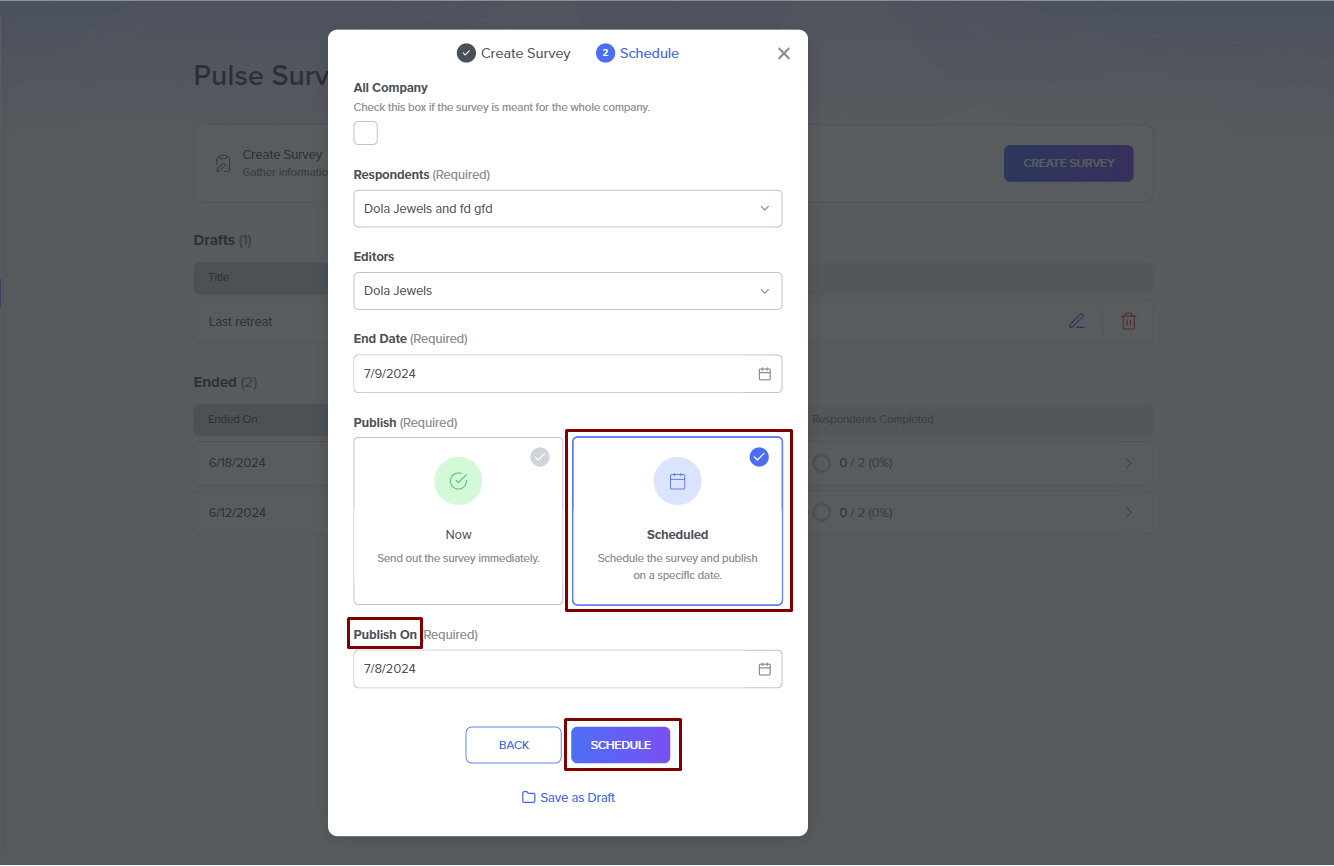
- Publish: A required field where you decide when you want the survey published. You can publish immediately or schedule a publication date. If you prefer to schedule the publication date, an extra field, Publish On, appears where you set the publication date.
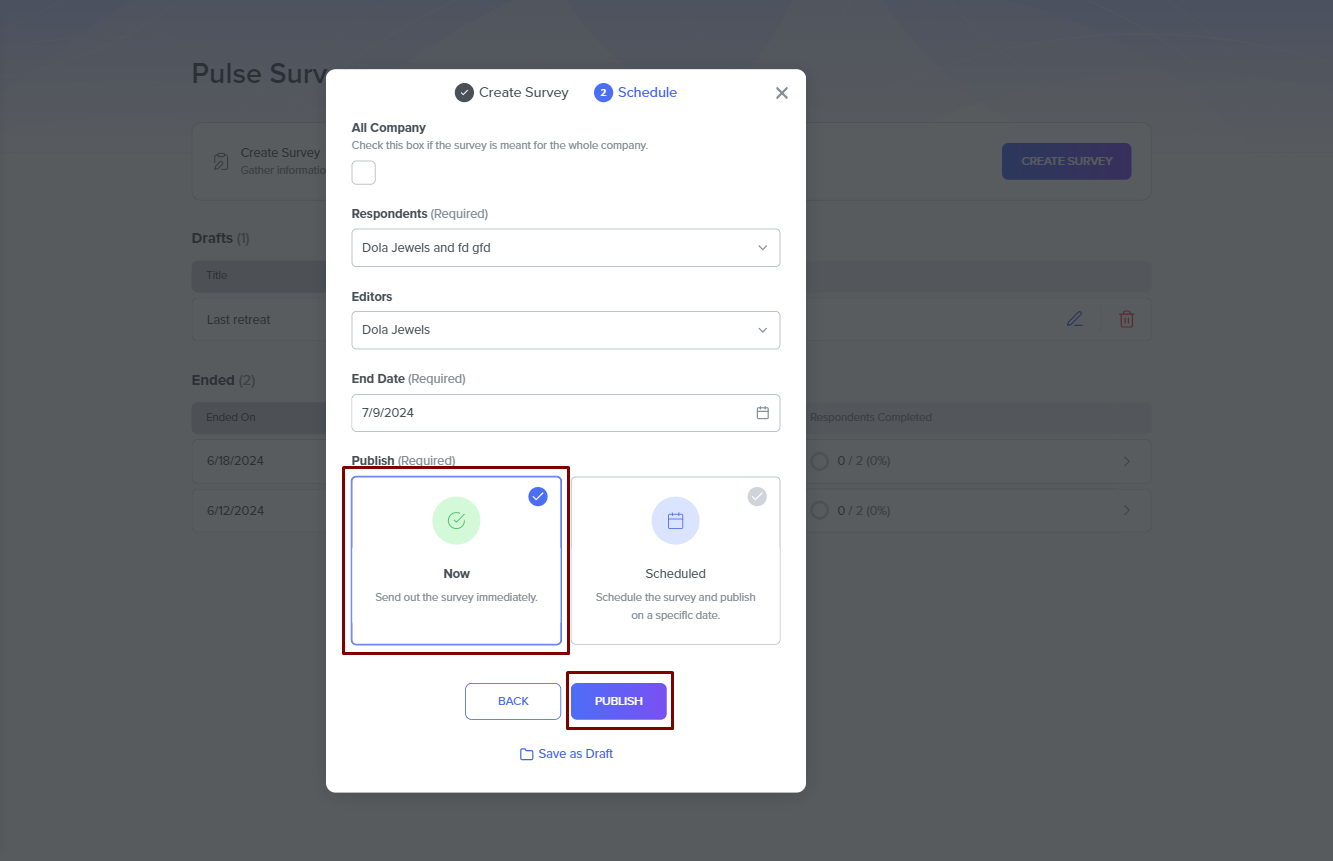
You can edit or review the previous step by clicking the Back button. You can publish the survey immediately or schedule the publication by clicking the Publish or Schedule buttons, respectively. Also, you can save the survey in its current form as a draft.
Once you publish your survey, the system notifies the respondents you selected when creating the survey by sending a notification email to their email addresses. This notification prompts them to complete the survey.
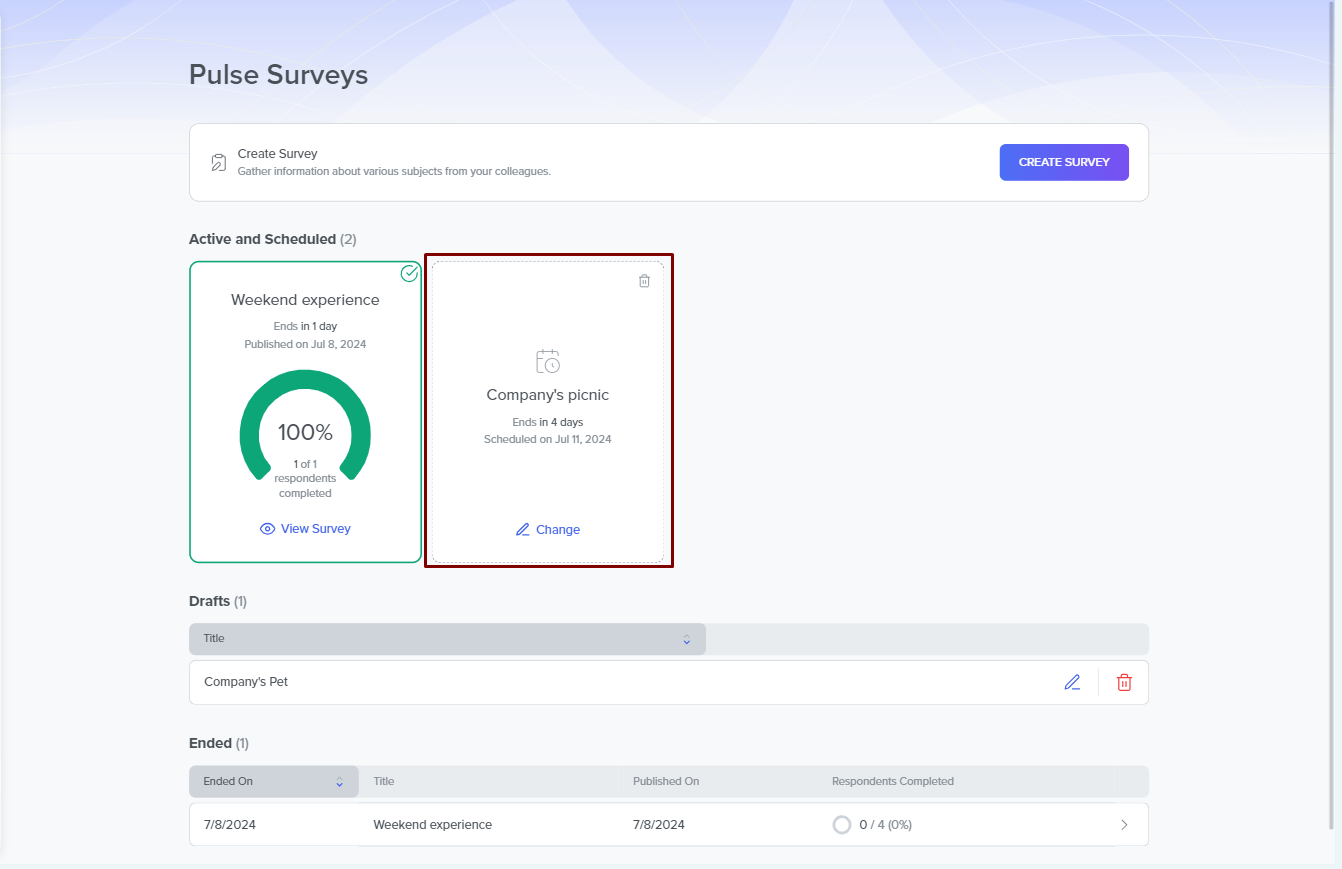
Active and Scheduled Surveys
This section is the next in pulse surveys. You see specific information about all your active or scheduled surveys. The system arranges each survey in cards that contain basic information about the survey.
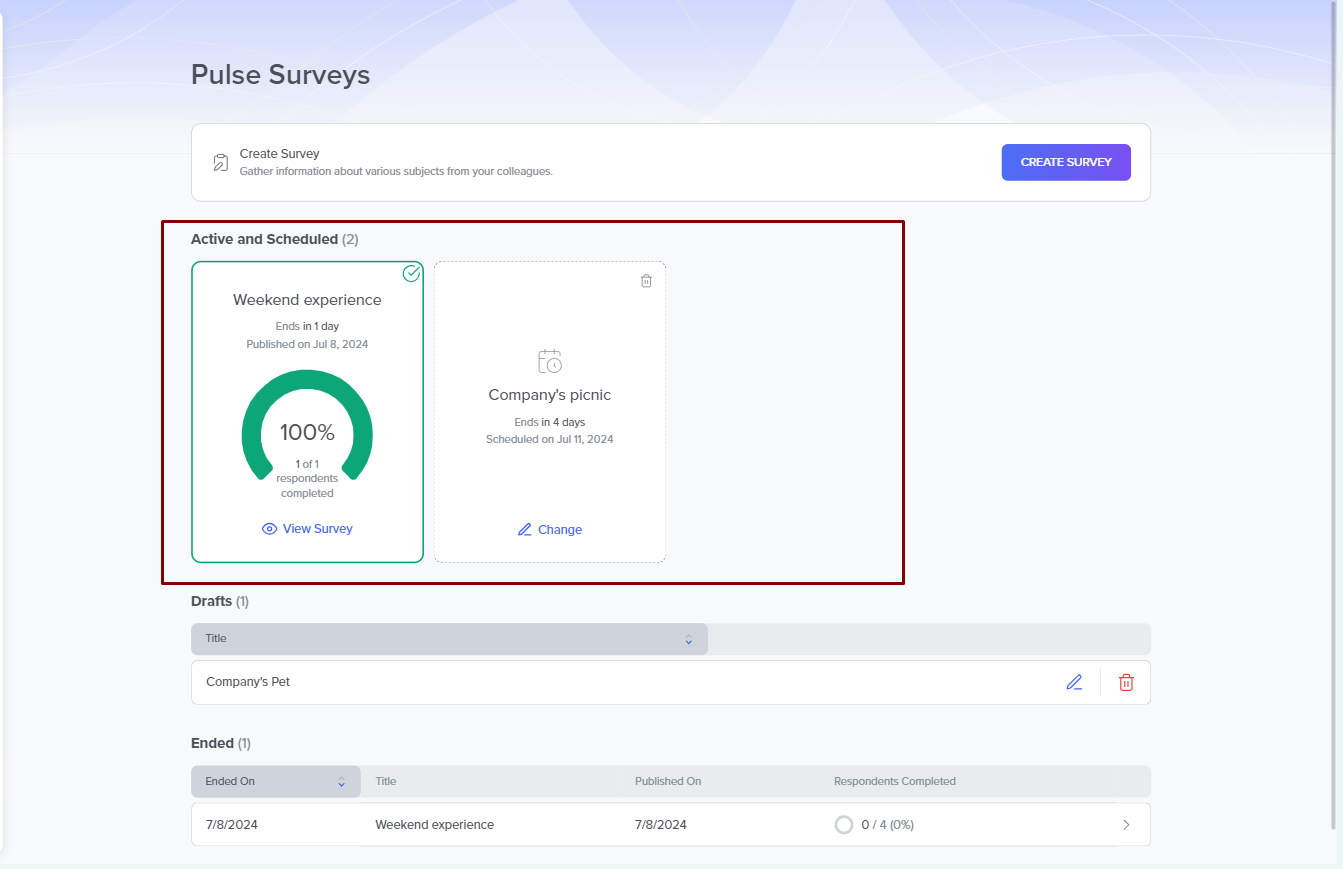
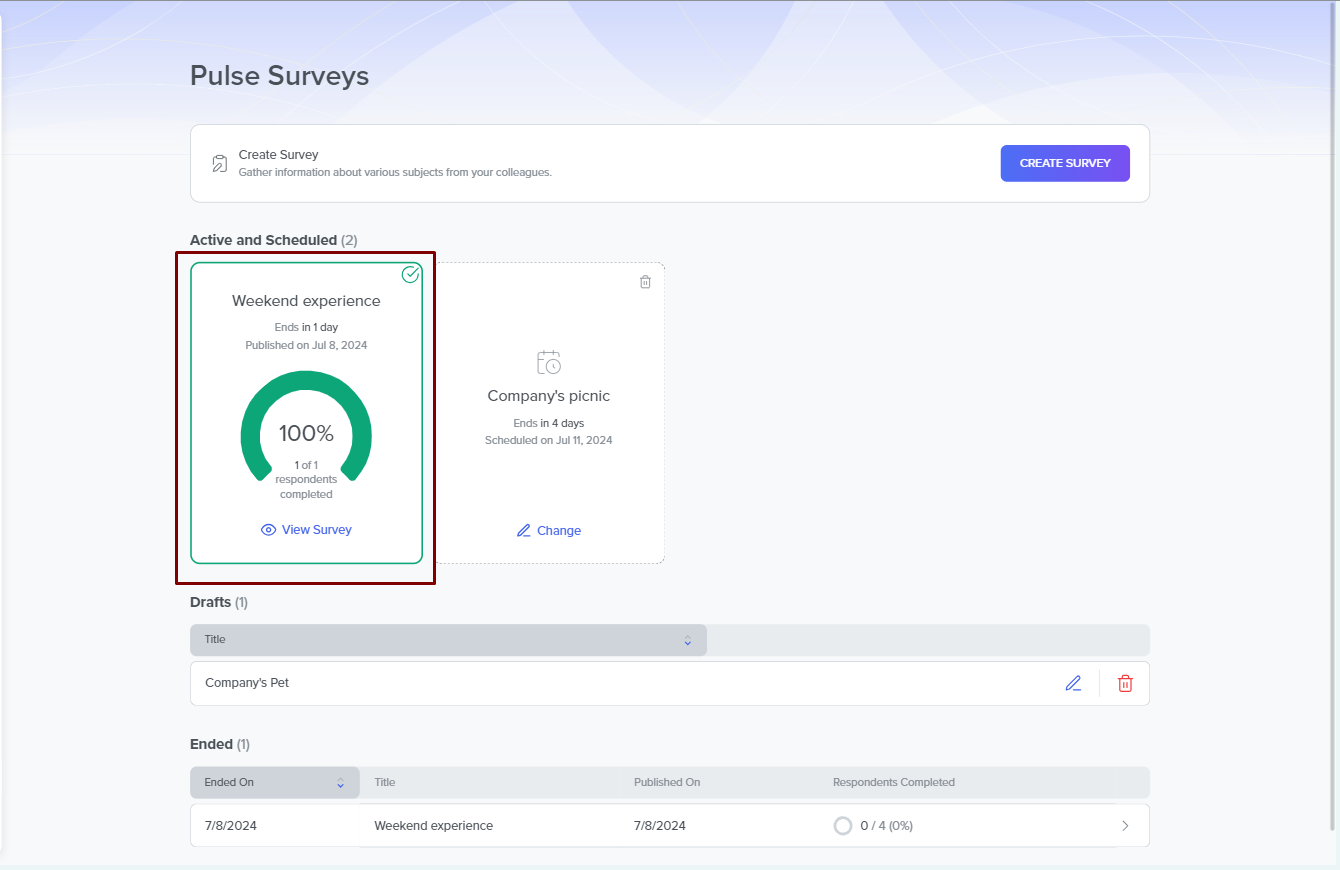
You can see the following information for active surveys:
- Survey title that you have pre-set.
- An icon to indicate all respondents have participated in the survey. You see it next to the survey title.
- The survey deadline indicates when the survey ends.
- Publish Date that shows when you published your survey.
- Percentage of respondents that have responded and the number of total respondents.
- View Survey button to see the survey details.
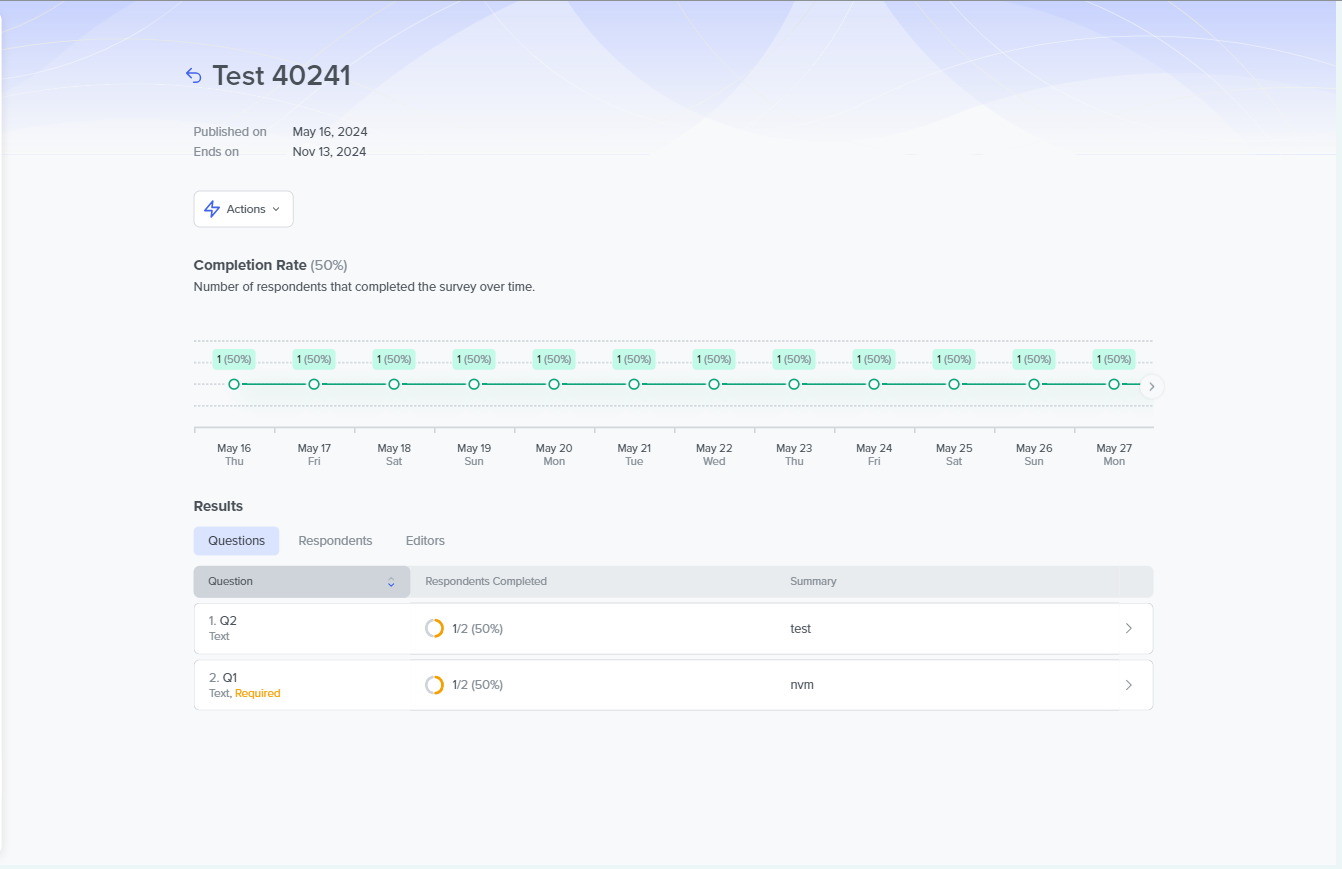
View Survey
This portion is clickable, revealing the page containing the survey details. The details of each survey include the following:
- Survey title, but also has a back button to go back.
- Intro Message, if you had it pre-set when creating the survey.
- Dates, which include the publish and end dates.
- Actions select box where you can select specific actions to perform.
Actions
The current options here include if you want to Extend the End Date, if you want to End the Survey, or if you want to Remove the Survey. Extending the end date moves the survey deadline forward, and both editors and creators can perform this action. Ending the Survey means bringing the deadline to the current day. Removing the survey means you cancel the survey, and only the creator can do this. Doing this will require an affirmative dialog on whether you want to remove the survey or cancel the removal.
- Completion rate graph, which shows the percentage of completed surveys at the time of review based on the days and the number of respondents who completed the survey.
- Results where you see the responses based on the questions, respondents, or editors.
You can see the following information for scheduled surveys:
- Trash icon to delete the survey
- Change button to edit your survey
- Schedule date for the survey
- Survey Deadline to show when the survey will end
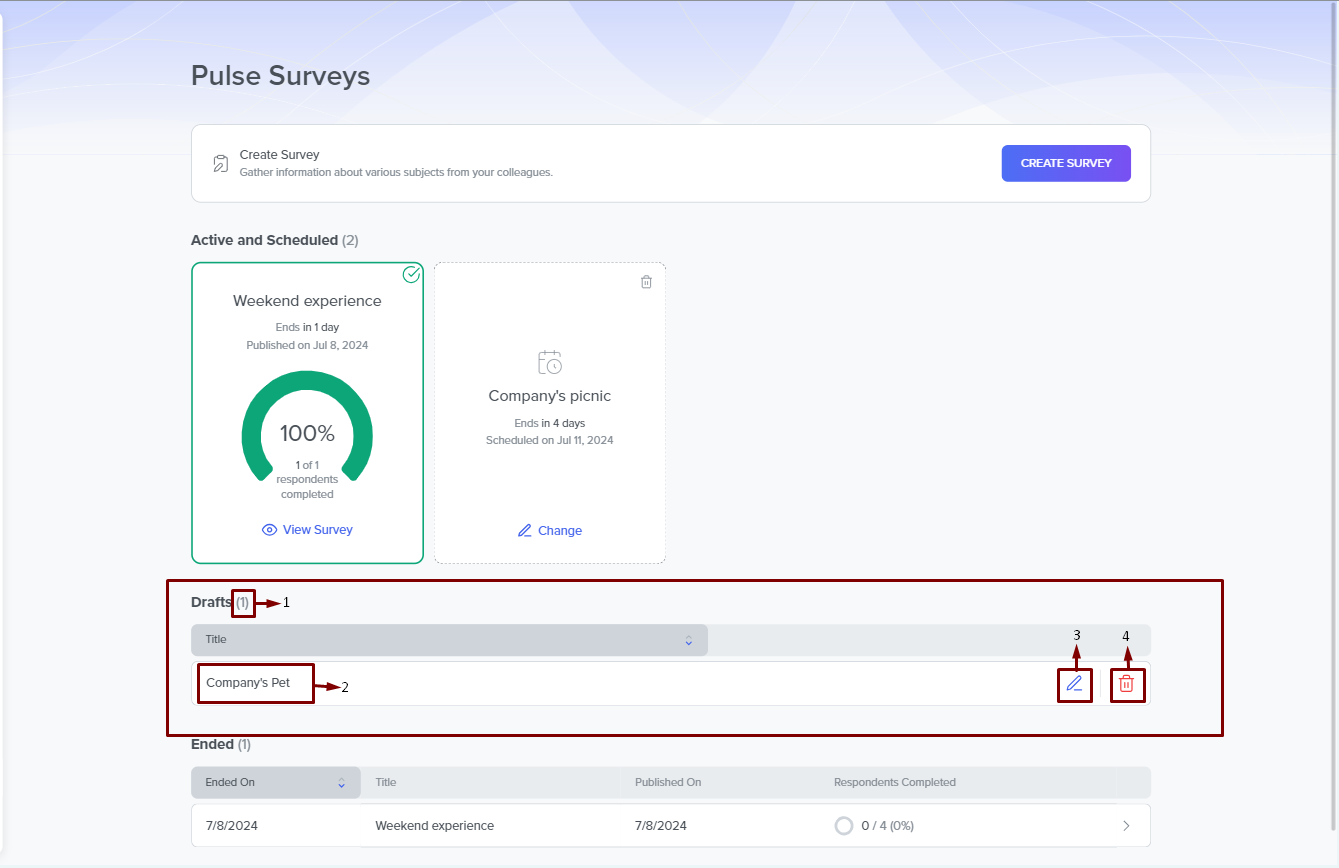
Drafts
The draft section in Pulse Surveys contains uncompleted proposed surveys. The section shows and allows you to do the following:
- The number of draft surveys that you have.
- The title of each draft surveys
- Use the pencil icon to continue editing your draft survey.
- The trash bin icon with which you can permanently delete the draft.
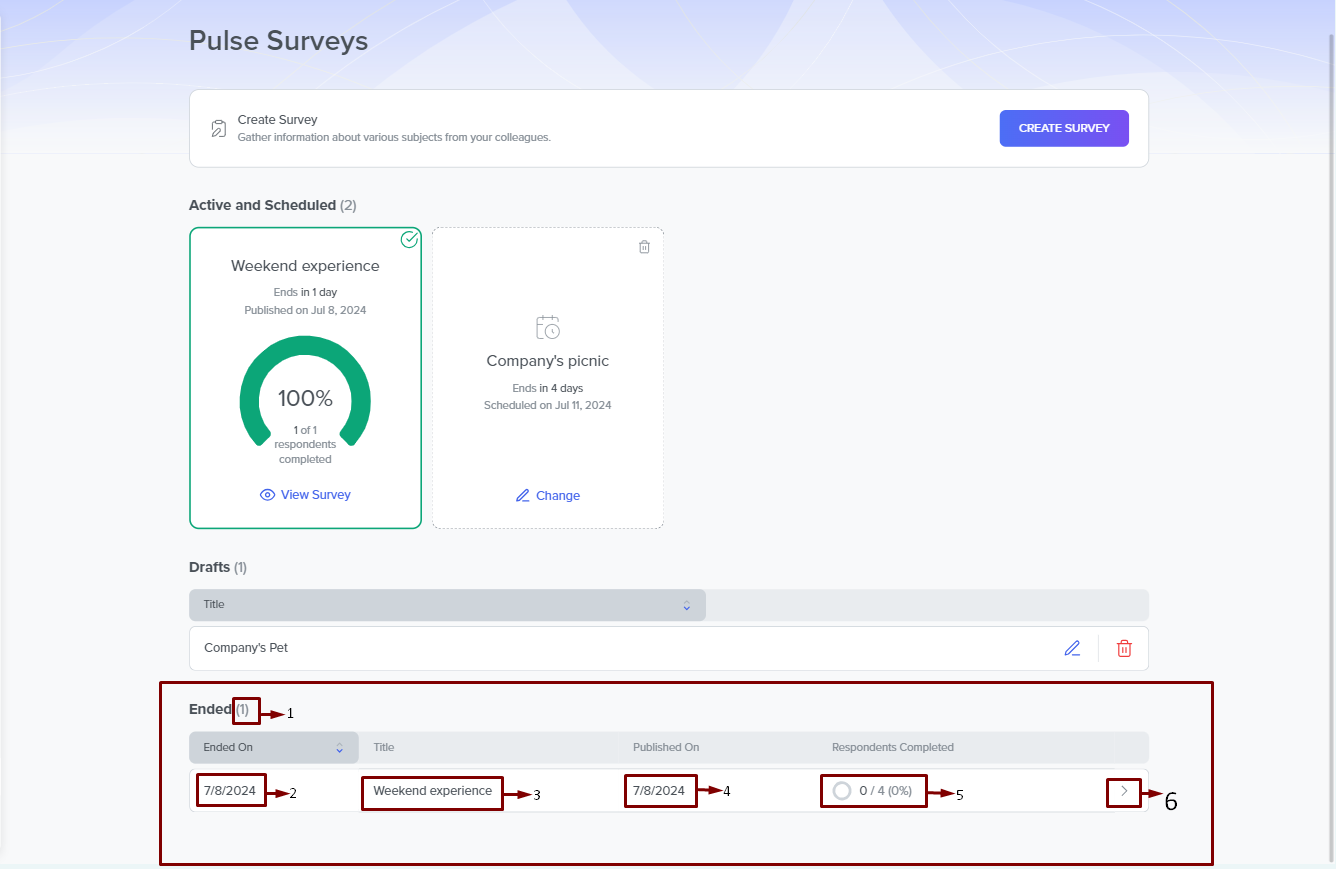
Ended
This section shows the surveys that are already completed. The sections show and allow you to perform the following:
- The number of completed surveys.
- The date the survey ended.
- The title of the survey.
- The date you published the survey.
- The percentage or ratio of respondents who completed the survey to the total number of respondents supposed to complete it.
- An arrow button that reveals the details of each survey.
Monitoring and Analyzing Survey Responses
You can track and analyze the responses to your active surveys by viewing the survey details of each survey. In the survey details, you can view the following:
- Completion rate Graph
- Results dashboard
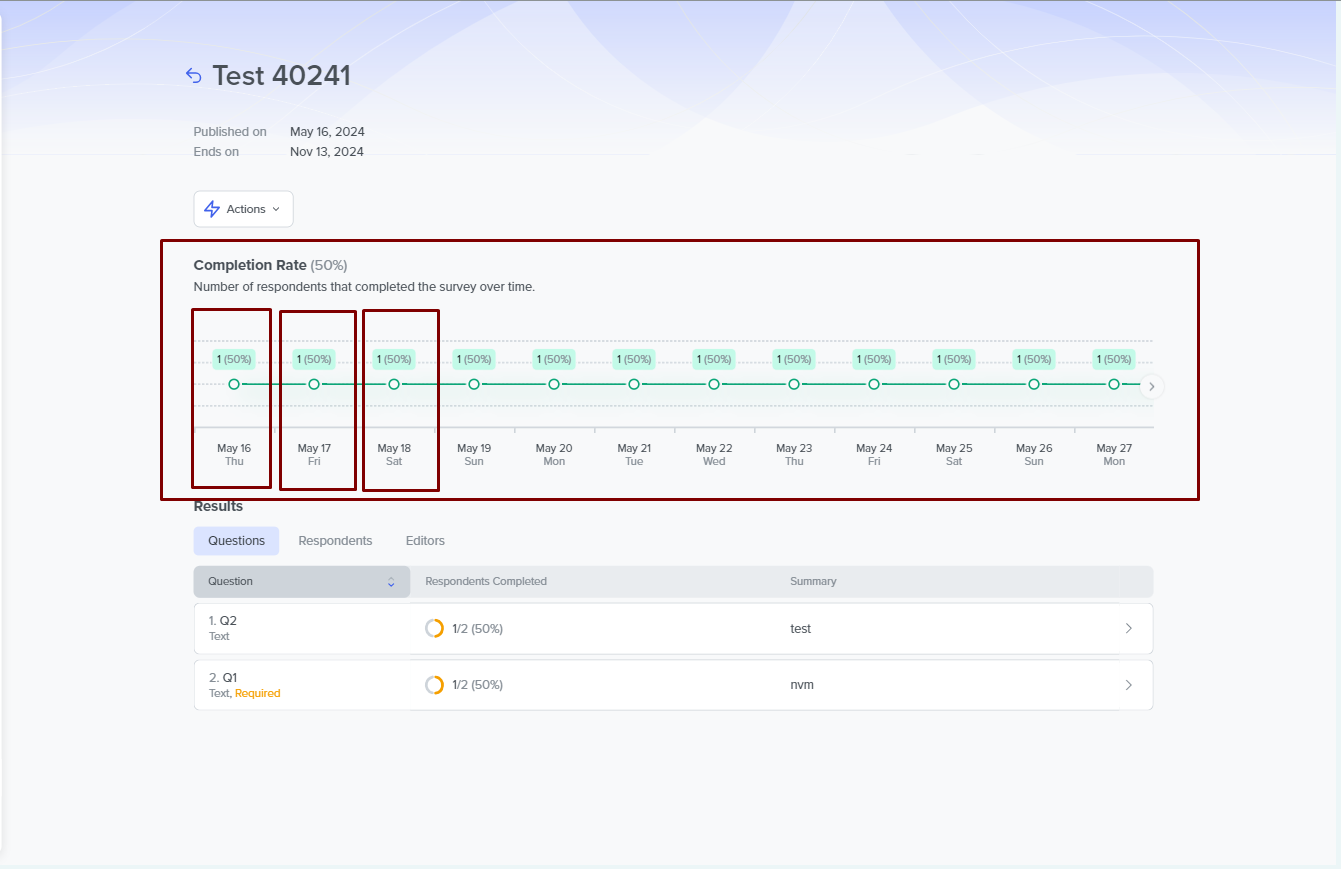
Completion Rate Graph
The completion rate graph shows the number of respondents who completed it over particular periods. It shows the total percentage of completed surveys per time. As it is a graph, the horizontal axis shows the days during which the survey was active, that is, from the publishing date to the end date. For each day on the graph, there is a corresponding percentage or number of respondents who answered the survey relative to the total number of expected respondents.
In subsequent days, if the percentage or number of responses increases, the graph moves vertically to reflect the increased number of received responses. This number is not the number or percentage of received responses for that day but the total number or percentage of received answers from the total expected.
To know the number of respondents you have on a particular day, you will have to manually subtract the number of respondents you have the previous day from the one you have for the current day.
Results Panel
Here, you can monitor and analyze your responses in three separate tabs. They are:
- Questions
- Respondents
- Editors
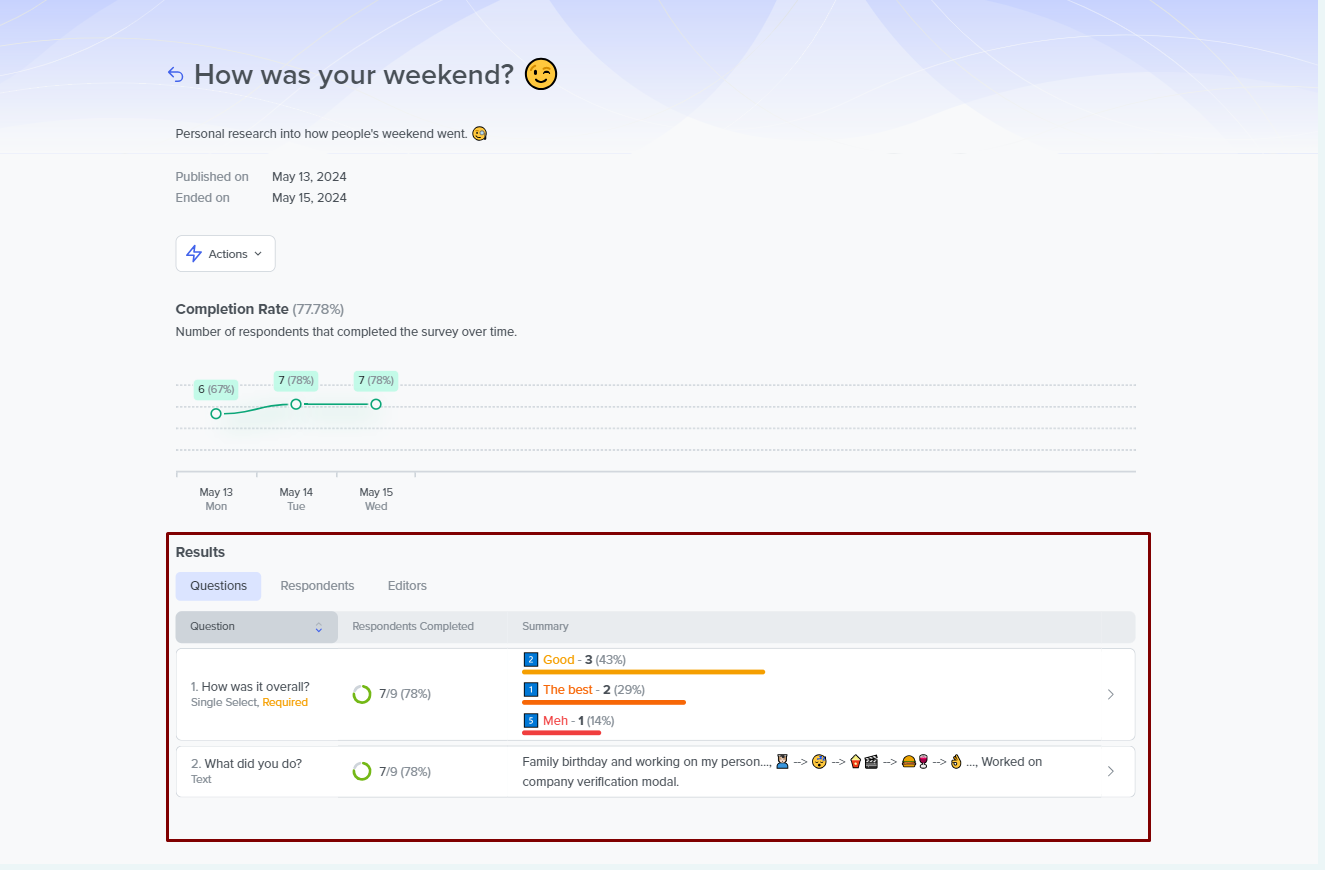
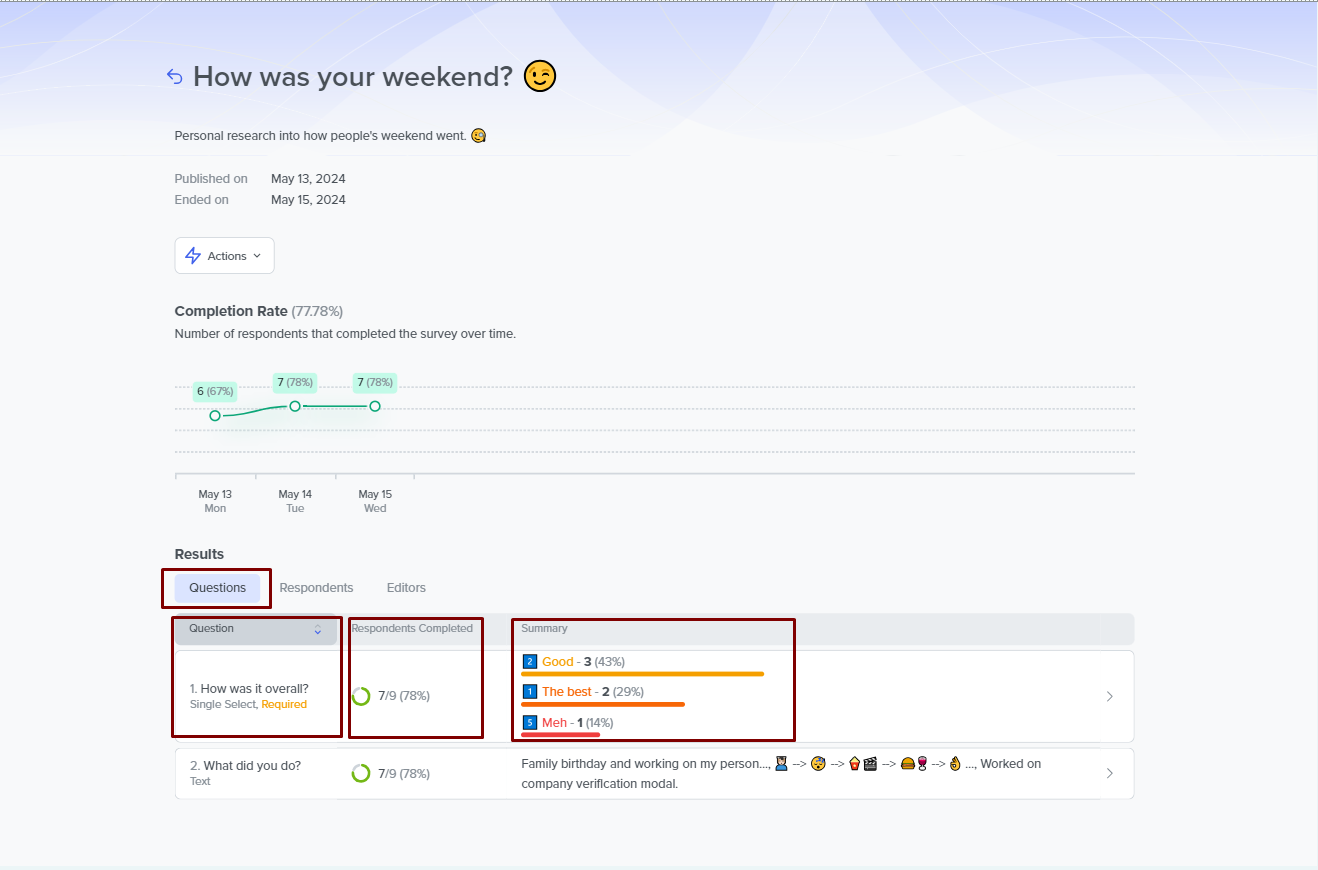
Questions
On this tab, you see the respondents' answers according to the questions in the survey. The tab shows and allows you to perform the following:
- The order of the questions in the survey, with the answer type beneath each question.
- The percentage and number of respondents that have completed the survey.
- The answer summary that depends on the answer type for the question.
Answer Summary
The answer summary column briefly explains how respondents answered each question. For example, the single-select answer type summary shows percentages for a maximum of the three most selected options and the number of respondents. The same summary applies to the multi-select answer type. The summary for the Checkbox answer type shows a small graph that indicates how the respondents answered. If the respondents don't toggle the box, the graph will be red. If otherwise, the graph will be green. If the ratio of answers is precisely 50%, the graph will be grey. The summary for the number answer type shows the average number from all the responses. Then, there is information about maximal and minimal numbers.
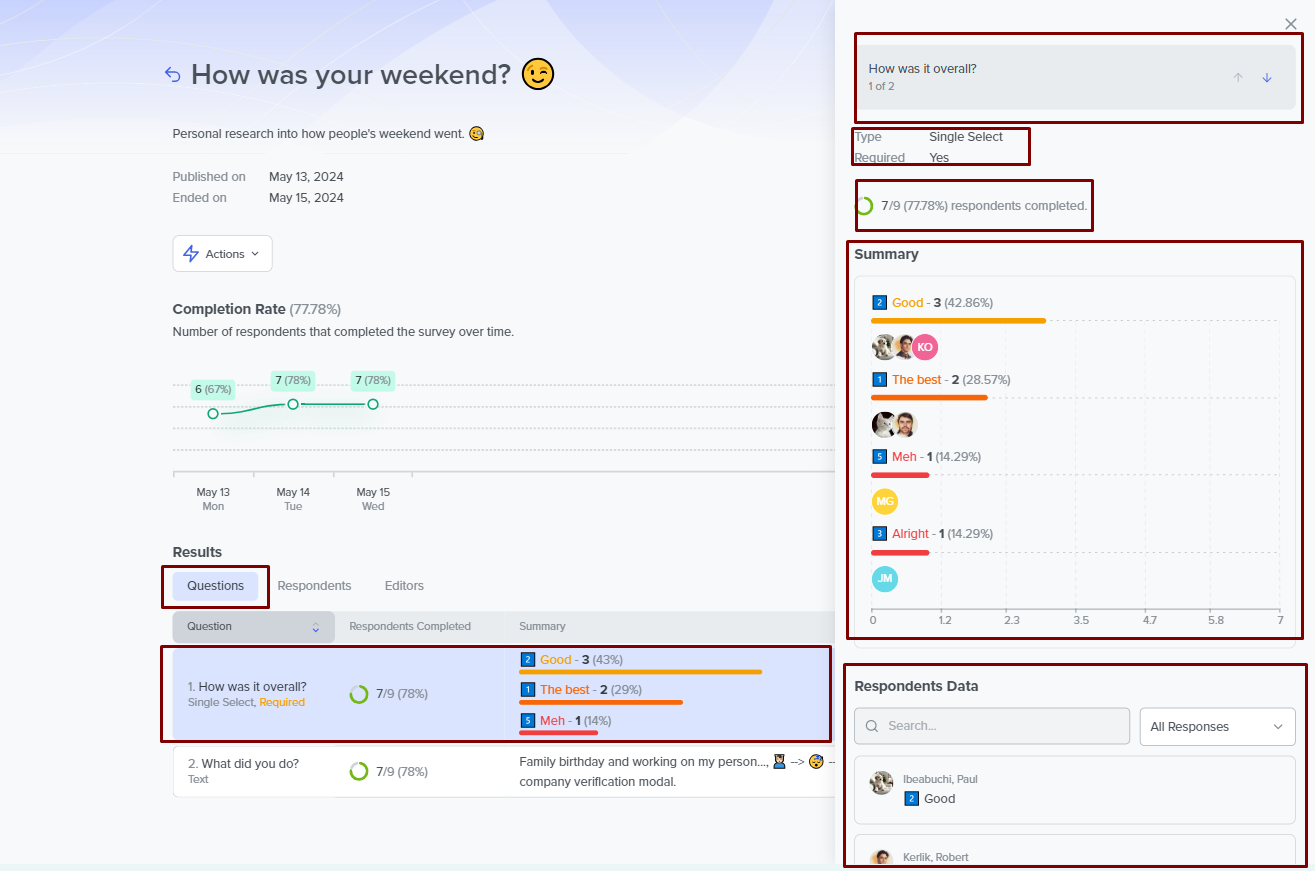
You can click each row of questions to open a right-sided panel to show a comprehensive detail about the question by:
- showing the question itself, next to which you see arrow icons that let you switch between questions without leaving the panel.
- showing the question's hint.
- showing the answer type and whether it's required or not
- showing the respondents' percentage.
- the answer's summaries, and
- the respondents' data where you can search and/or copy the answer for a specific employee. If you click on the employee, the system takes you to the panel with the employee's answers.
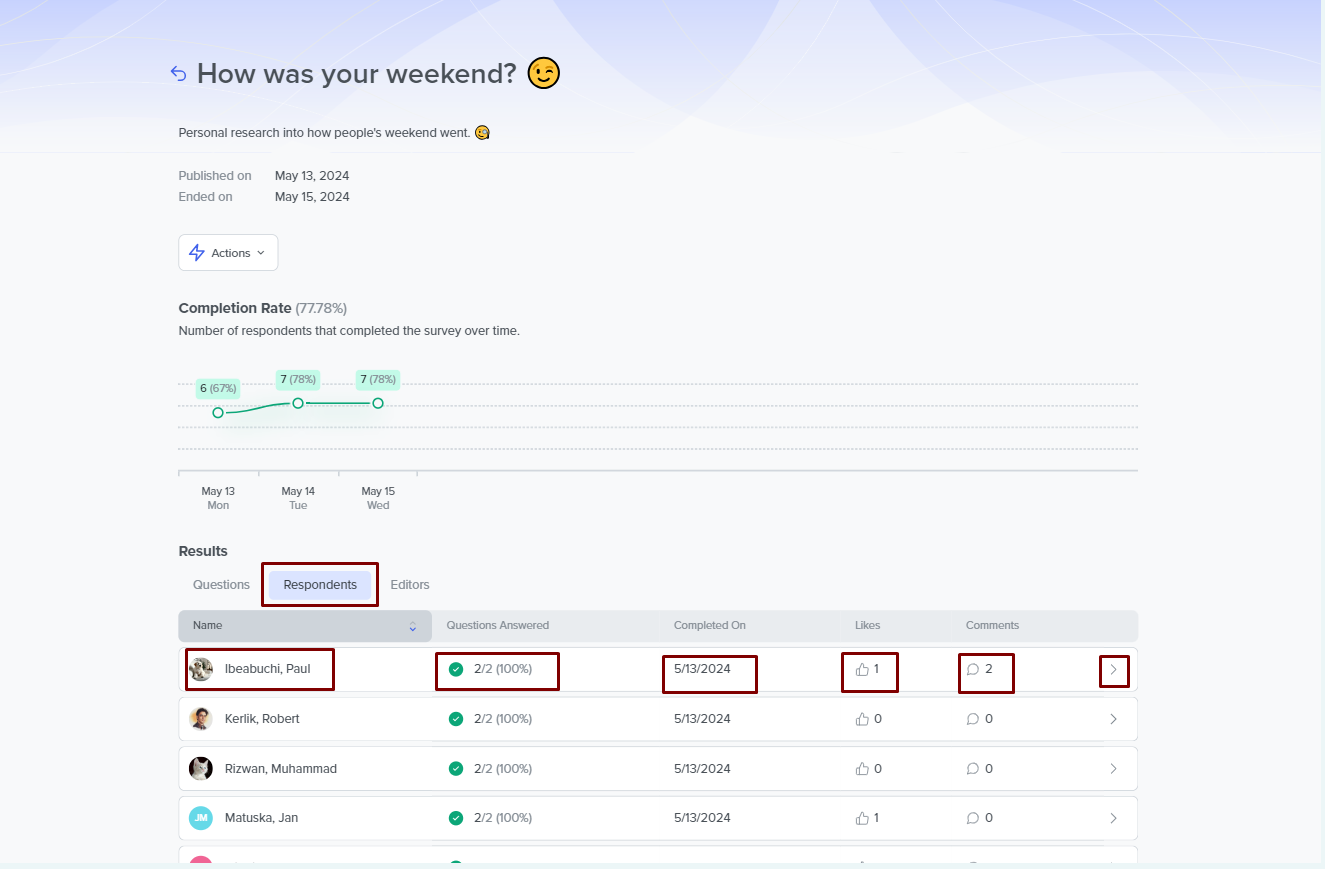
Respondents
The respondents' tab shows an overview of the answers to the questions in the survey by each respondent. In the tab, you can see the following:
- The respondent's name and profile picture.
- The percentage of the questions they answered to the total number of questions.
- The date they completed the survey.
- The number of likes their answers got that is visible only to the editors and the author.
- The number of comments the respondents answers got, received by the editors and the author.
- The right arrow button that takes you to a more comprehensive view on the right-side panel.
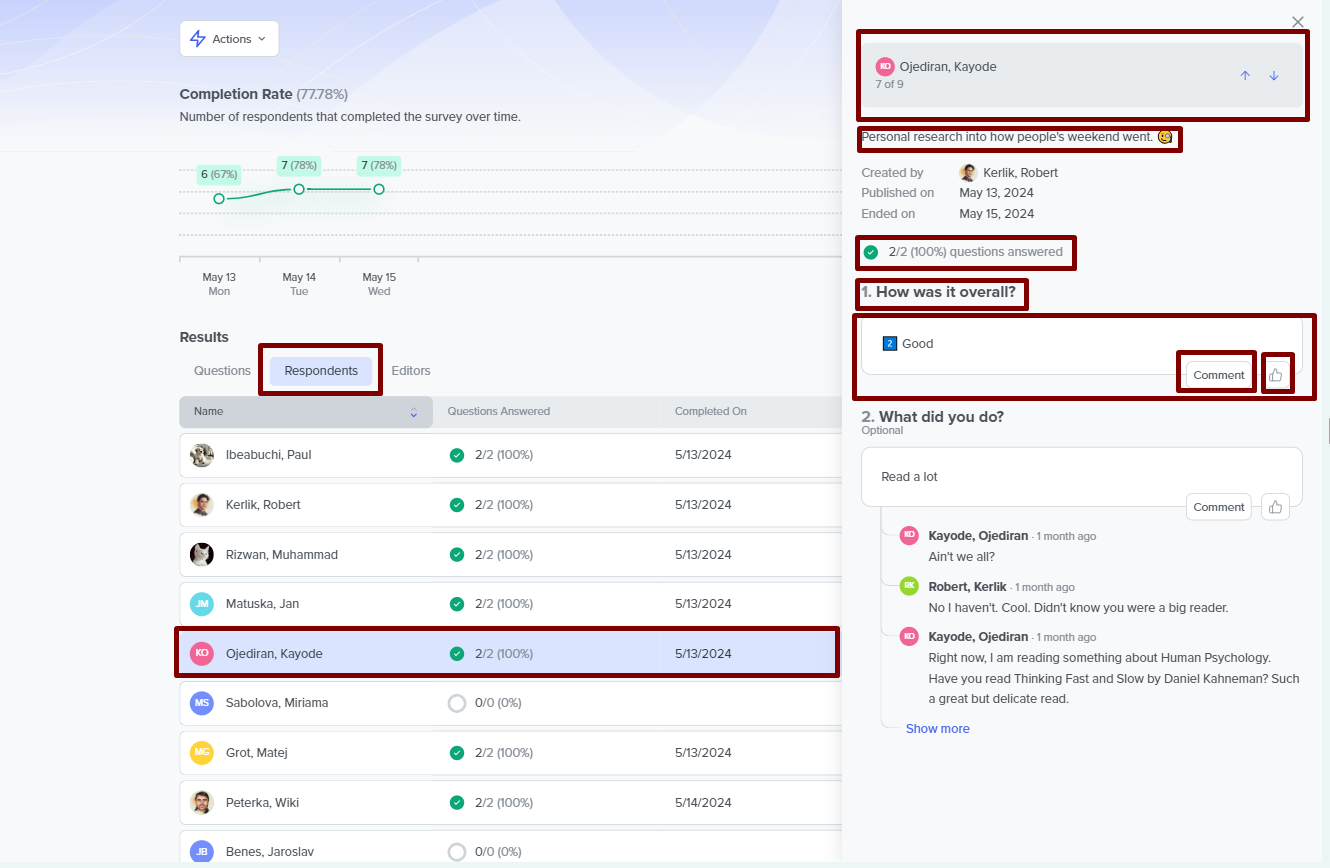
In the more comprehensive view, you can see the following:
- The respondent's name and profile picture, with the order of the respondent in the total number of respondents directly below. You can also switch between respondents using the arrow icon on the right side of the name without leaving the panel.
- The completion date.
- The percentage of questions answered to the total number of questions.
- The question and hint.
- The respondent's answer to the question.
- A button to Add Comment, which only one of the editors or the author can add.
- A Thumbs Up icon for the editors or the author to like the respondent's answer. A highlighted icon indicates that you have already liked the answer, and the number beside the icon shows the number of likes the answer has.
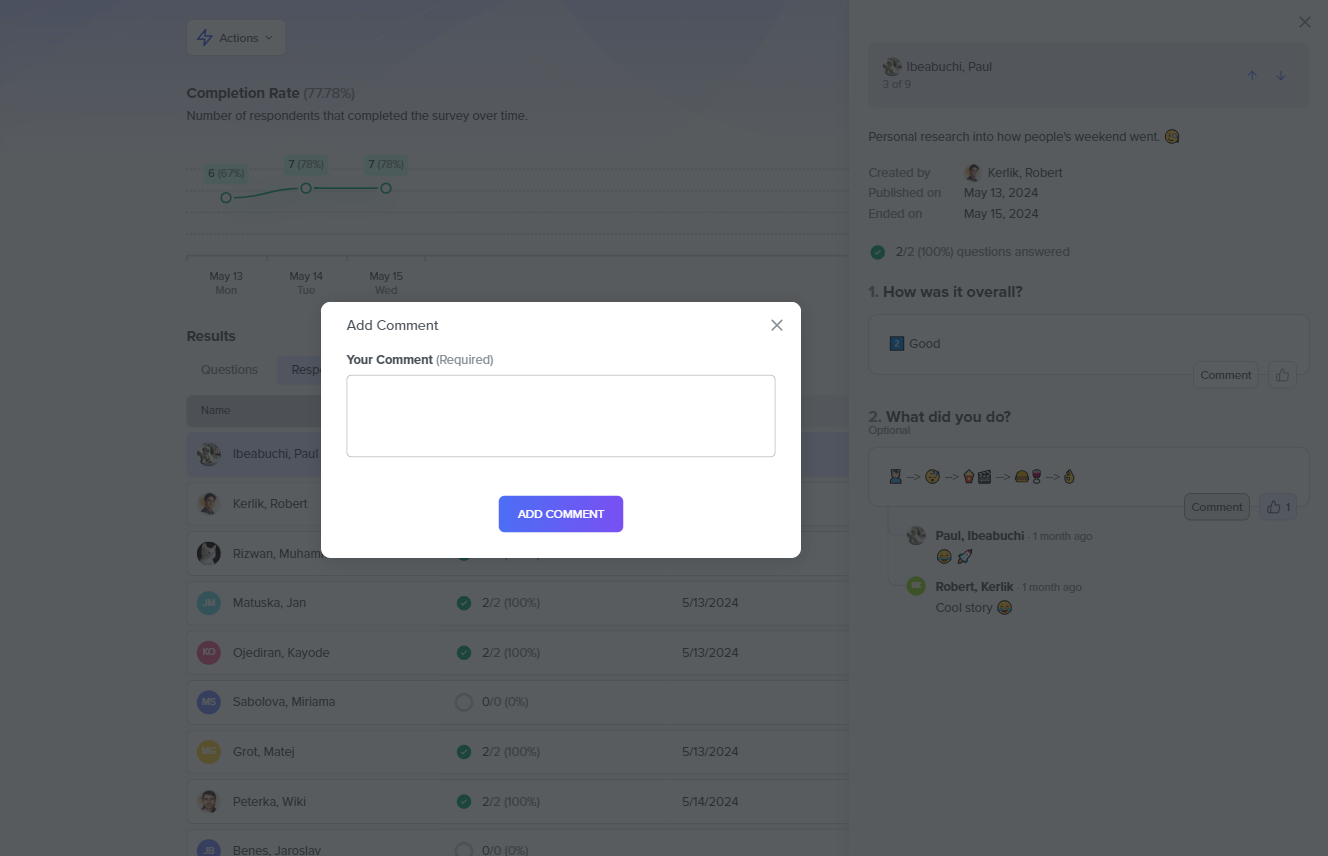
Comments
If you click the Add Comment button, a new mini-modal appears with a field titled Your comment. You input your comments in this field and complete the process by clicking the Add Comment button underneath the field.
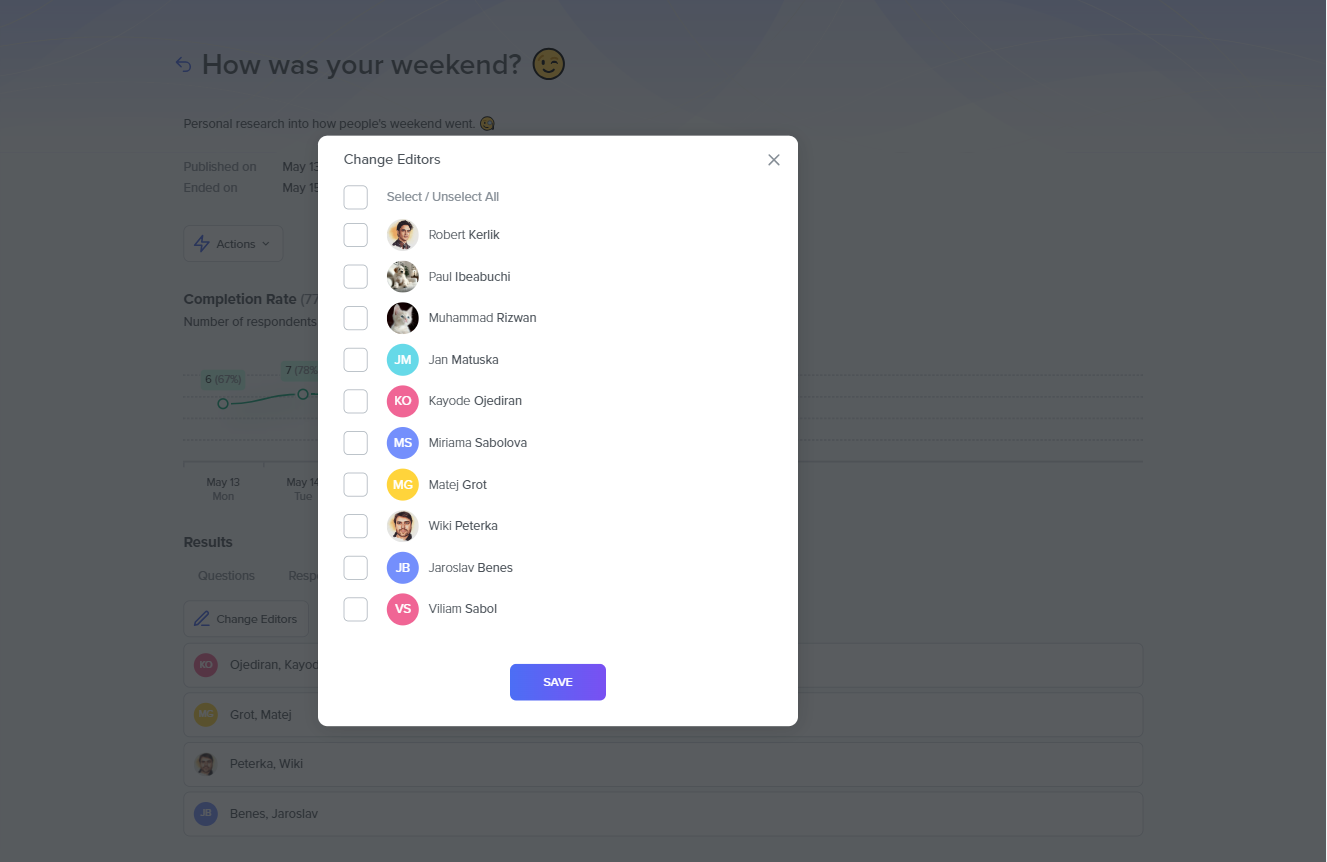
Editors
In this tab, you can see the names of current editors and their profile pictures.
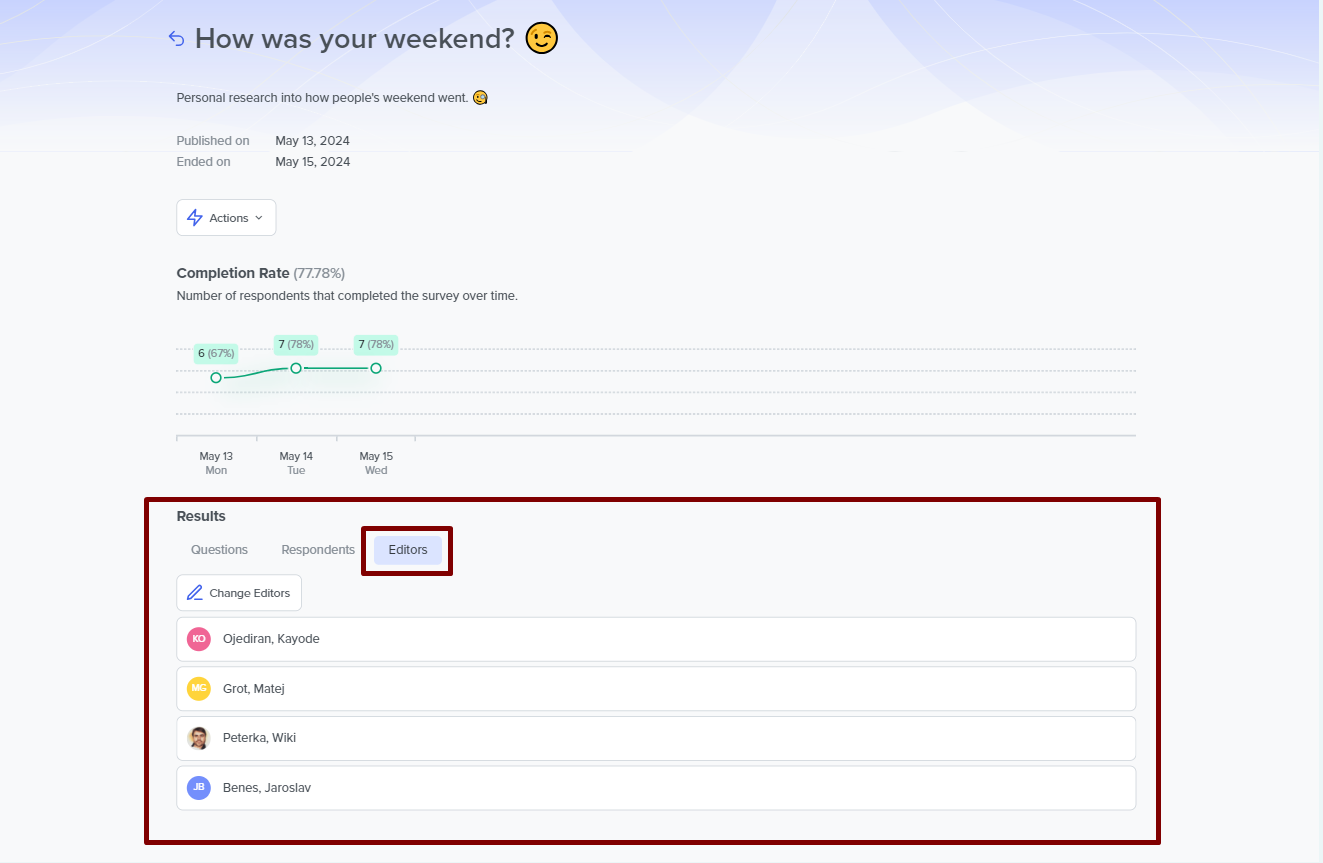
Also, you can change the current editors by clicking the Change Editors button.
Need Help?
If you have questions or need assistance with pulse surveys, contact the DecisionHR support team or consult the help resources available on the platform.